The Elder Scrolls V: Skyrim

The Elder Scrolls V: Skyrim

99 ratings
Skyrim's Puzzles
By Altbert
An overview of the various puzzles found in Skyrim and on Solstheim
   
Award
Favorite
Favorited
Unfavorite
Dragon Claws & Nordic Puzzle Doors
Dragon Claws are used to open the large Nordic puzzle doors found in Nordic ruins. Selecting a claw in your inventory and turning it around will show a combination of three animal/creature symbols. This combination, from top to bottom correspond with the three rings or wheels of the puzzle door from outer ring to inner ring. Activate each ring until the combination of the door matches the combination of the claw.
These puzzle doors are found in Bleak Falls Barrow, Dead Men's Respite, Folgunthur, Forelhost, Korvanjund, Reachwater Rock, Shroud Hearth Barrow, Skuldafn, Valthume and Yngol Barrow.


Amethyst Dragon Claw (Dragonborn)
Related quest: Lost Legacy[en.uesp.net]
Combination: None
Nordic ruin: Vahlok's Tomb (loot the bodies of the bosses near the Northern Gate and Southern Gate for the two halves of the claw.


Coral Dragon Claw
Related quest: Yngol's Barrow[en.uesp.net]
Combination: Snake-Wolf-Moth
Nordic ruin: Yngol Barrow
This claw can also obtained from Birna of Birna's Oddments in Winterhold.


Diamond Dragon Claw
Related quest: The World-Eater's Eyrie[en.uesp.net]
Combination: Fox-Moth-Dragon
Nordic ruin: Skuldafn


Ebony Dragon Claw
Related quest: The Jagged Crown[en.uesp.net]
Combination: Fox-Moth-Dragon
Nordic ruin: Korvanjund


Emerald Dragon Claw
Related quest: Forbidden Legend[en.uesp.net]
Combination: Bear-Whale-Snake
Nordic ruin: Reachwater Rock


Glass Dragon Claw
Related quest: Siege on the Dragon Cult[en.uesp.net]
Combination: Fox-Owl-Snake
Nordic ruin: Forelhost


Golden Dragon Claw
Related quest: The Golden Claw[en.uesp.net]
Combination: Bear-Moth-Owl
Nordic ruin: Bleak Falls Barrow (loot the body of Arvel the Swift)


Iron Dragon Claw
Related quest: Evil in Waiting[en.uesp.net]
Combination: Dragon-Eagle-Wolf
Nordic ruin: Valthume


Ivory Dragon Claw
Related quest: Forbidden Legend[en.uesp.net]
Combination: Eagle-Eagle-Dragon (both locations)
Nordic ruin: Folgunthur
Nordic ruin: Reachwater Rock


Ruby Dragon Claw
Related quest: Tending the Flames[en.uesp.net]
Combination: Wolf-Eagle-Wolf
Nordic ruin: Dead Men's Respite


Sapphire Dragon Claw
Related quest: Lifting the Shroud[en.uesp.net]
Combination: Moth-Owl-Wolf
Nordic ruin: Shroud Hearth Barrow
This claw is obtained from Wilhelm, innkeeper of the Vilemyr Inn in Ivarstead after you have given him the journal of the 'ghost' of the barrow.
Rotating Nordic Puzzle Pillars
Ansilvund
Combination: Eagle-Snake-Whale-Snake
This combination can be found in the book Of Fjori and Holgeir on the table near the entrance, on the table below the pillars or carved in the wall below the pillars.

Barleydark Farm
Combination: Whale-Eagle-Snake
Barleydark Farm is a location not known as such in the game. It is situated southeast of Sleeping Tree Camp. It only consists of three rotating pillars, a trap gate and rubble. The solution can be found on or near the large pillars behind the rotating pillars, the first one (whale) on the back side of the large pillar.

Bleak Falls Barrow
Combination: Snake-Snake-Whale
This combination can be found above the gate that is opened with a lever when the pillars are in the correct order. The mid statue has fallen on the floor next to the lever.

Folgunthur
Combination: Eagle-Whale-Snake
When entering a room with a trap gate, you may notice a pull chain to the left. Opposite the pull chain are two smaller rooms, the left one with the puzzle pillars and the right one with the symbols. You will have to mirror these symbols from left to right.

Geirmund's Hall
Combination: Eagle-Whale-Snake-Whale
The combination is found on the walls before reaching the first pillar. The four pillars are not located next to one another, but you will have to find these one at a time. The first one is at the bottom of the stairs, the second one is next to the stairs, the third one is behind a table and the last one is near a lever. The lever opens a door to the north after all pillars are in the correct position.

Saarthal
In the first puzzle room you will find two sets of pillar puzzles:
Combination (1): Eagle-Snake-Whale
Combination (2): Whale-Eagle-Eagle
Each pillar must be rotated until the symbol on the pillar matches the symbol on the wall behind the pillar.
The second puzzle room is a bit more difficult:
Southeast: Whale
Northeast: Snake
Southwest: Eagle
Northwest: Whale

Shroud Hearth Barrow
Combination: Whale-Eagle-Snake-Whale
When you reach the pillars enter the door in the middle and use the pressure plate in the center of the room to find the correct combination. Leave the room and rotate the pillars to match the combination from left to right. Then use the pressure plate to lower the bridge.

Skuldafn Temple
Combination (1): Snake-Eagle-Whale
Combination (2): Snake-Snake-Whale
Two side pillars need only to be rotated once into the correct position and must face outwards. The one in the middle must face the gates. Symbols for the gates are carved above the gates. Both gates can be opened by pulling the lever. Opening the second gate will not close the first gate.

Skuldafn Temple
Combination (3): Whale-Snake-Eagle
The first pillar is right in front of you when entering the room. The solution for this pillar is found at the rear of the room. The other two pillars are found on the upper level and must match the symbol high above the pillars. The lever in the middle of the walkway can then be used to lower a wooden bridge.

Unmarked Nordic Ruin
Combination: Whale-Eagle-Snake
West of Fort Greymoor and southeast of Sleeping Tree Camp you will find some ancient Nordic ruins with three puzzle pillars. The solution can be found nearby. Symbol for the westernmost pillar is at the rear of the large pillar. The symbols for the other two are found between some rubble on the ground.

Glowing Stones


Ustengrav
Combination: None
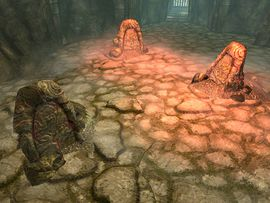
After crossing the large stone bridge in Ustengrav Depths you will find three stone posts. Each post activates a gate in front of you. Coming close to a post you will hear a sound, the post will be covered in red light and a gate will open. Standing in between the first two posts will open two gates. Using the Whirlwind Sprint shout you will most probably only get past the first or first two gates. There are pull chains to open the first two gates permanently. Once solved the gates will remain open.

The Greybeards will learn you and unlock one word of the Whirlwind shout. Before going to Ustengrav or even before going to High Hrothgar you can learn the other words in Dead Man's Respite and atop the hill at Volskygge. You will need dragon souls to unlock these two words.
Kinetic Resonators


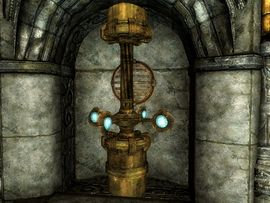
Kinetic resonators are Dwemer constructions consisting of four blue orbs set in paddle-like extensions on a metal pole. When activated the orbs will spin around the pole. Several resonators can be combined into a socalled tonal lock, in which case the resonators have to be activated in the correct order to solve the puzzle. These puzzles have to be solved only once and the gates remain open after first completion. Activate the resonators by using a ranged weapon, trying to hit one of the blue orbs.

Arkngthamz (Dawnguard)
Before reaching the end of Arkngthamz you will encounter a few kinetic resonators. By activating these a gate will open. To open the gate at the end, you have to solve a puzzle consisting of five resonators combined into a tonal lock. Activate the resonators in the following order: bottom left, bottom right, top left, top right and bottom middle.

Fahlbtharz (Dragonborn)
In Falhbtharz Boilery you will find a tonal lock consisting of six kinetic resonators, that control the boiler. Three resonators to the left of the boiler and three to the right. The puzzle is solved when all twenty steam meters of the boiler are powered and none is overpowered. The six resonators have the following values respectively: 3, 4, 6, 9, 13, 18. Ulyn's journal gives a hint for the values of the resonator 1 and 6: 3 and 18. To solve the puzzle hit resonators 1, 2 and 5 (3+4+13=20).

Fahlbtharz also contains a 10-button control panel. The top-left button opens and closes the gate on the west side of the room through which you first enter the room. The second button from the left of the bottom row opens and closes a novice locked door on the north side of the room. The second button from the right of the bottom row opens and closes the gate on the southeast side of the room. The rightmost button on the bottom row does nothing, unless you have the Unofficial Dragonborn Patch installed. All other buttons activate various Dwemer contraptions.
Resonance Gems


Kagrumez (Dragonborn)
A total of five resonance gems can be found on Solstheim, two inside Kagrumez, one in Nchardak (aquaduct) and one near the Visage of Mzund in Fahlbtharz. You will need four gems to open three gates with a pattern of three or four blue dots. In the main chamber is a console with a pattern of nine holes, in which you can place the gems. Place the gems according to the pattern above the doors. The first two patterns require three gems, the third and last one requires four gems. After placing the gems the main chamber will dramatically change and you will have to face a number of Dwarven automatons before you can continue through the opened gate.
Sliding Braziers
Dimhollow Cavern (Dawnguard)
In the main room of Dimhollow Cavern across the brige you will find a puzzle on an island. First push the button in the center. Part of the floor will be lit by purple flames. Push the braziers surrounding the button back or forth until the fire has lit all braziers in a pattern around the center. When the final brazier is in place, a stone monolith will rise. Activate the monolith to reveal Serana with her Elder Scroll.
Spinning Stone Pillars


The Karthspire
At a certain point after entering Karthspire Redoubt you will find three rotating stone pillars with unusual carvings. All three pillars have to be rotated so that you face three carvings as shown in the following picture. When the last pillar is placed in the correct position a stone bridge will be unlocked and drop into place. Crossing the bridge and following the tunnel you will enter a room full of pressure plates. Only walk on the pressure plates that have the same carving, that looks like a stilized bee's head with an arrow pointing down, until you reach a pull chain. Activating the pull chain will deactivate the pressure plates.

Dwemer Lever Puzzle
Before being able to continue into Mzinchaleft Depths you well encounter an area with six sections, each containing a lever and separated by raised spears in two parallel lines:

6 5
4 3
2 1

You will have to activate the levers in the following order: 1, 2, 4, 2, 3, 5, 3, 2, 6. In the sixth area activate the red valve. The valve will lower all spears simultaneously and allows access towards Mzinchaleft Depths.
Dwemer Oculory
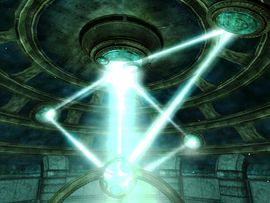
To be able to solve this puzzle inside Mzulft Oculory you need a focusing crystal and two destruction spells, Flames and Frostbite. The focusing crystal will only be available during the quest Revealing the Unseen and is carried by one of four Falmer in Mzulft Observatory. In this room you will also find a key in a chest on the east side of the room. This key will give access to Mzulft Aedrome where you will meet Paratus Decimus, who will lead you to the Oculory. Place the focusing crystal in the oculory, into a gap at the bottom of the large ring. Looking up to the dome you will notice three horizontal blue bands, each with one round reflector. Casting the Flames and Frostbite spells to the center of the ring where you placed the crystal will reposition the beams of light that have appeared. Use these spells, and no other spells, as long as each beam of light points into the middle of a blue band (and not to the horizontal gold rims that separate the bands).Walk up the ramp at the southeast side of the room and use the buttons to rotate the blue bands until the reflector on each band aligns with a light beam. The left button controls the top band, the middle button the middle band and the right button the lower band. Once the oculary is properly focused, it will appear as in the following picture.

Nordic Lever Puzzles
Folgunthur
When exploring Folgunthur you will enter a short passage with four levers, two on either side, and a series of lowered gates. Each lever opens or closes one or more gates. To open all the gates you will have to pull the first lever on the left and the second lever on the right. When all levers are pointing down the puzzle will be reset.

Shroud Hearth Barrow
After entering the barrow a winding wooden stair is going down. A passage continues downward ending in an intersection with a room blocked by a gate to the right and another room to the left. Inside the room to the left you will find four levers, two on either side of the entrance. Activate the two levers closest to the door. These will open the gate on the other end of the passage.
Other Nordic Puzzles
High Gate Ruins
Combination: Eagle-Whale-Fox-Snake
The solution is carved in rock high up on the wall in a room with trap gate and four levers. Those four levers have to be pulled in the correct order. A carving below the lever will show the way, two levers on sort of a balcony and two levers below.

Lost Valkygg
Combination: None
You will find three pressure plates in front of a doorway. If the doorway is blocked by vertical bars, activate the plates in the order from farthest to nearest to the doorway. Otherwise avoid the pressure plates.

Volskygge
Combination: Snake-Bear-Fox-Wolf
The solution to this combination is found in the book The Four Totems of Volskygge:
The first fears all, The second fears none.
The third eats what it can, Preferably number one.
The fourth fears the second, But only when alone.
All must be activated in order, If you wish to go home.
Four pull bars must be activated in the correct order, according to the carvings below the pull bars.

Yngol Barrow
Combination: None
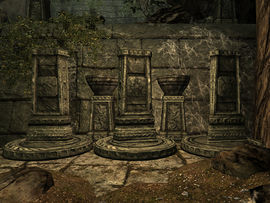
In the puzzle room in Yngol Barrow you will find four alcoves. Ignore the alcove with the throne. The alcove to the right of the throne has running water and the pillar should be turned to Whale. The pillar in the opposite alcove with weeds and plants should be turned to Snake and the pillar in the last alcove with sunlight should be turned to Eagle.
37 Comments
Mosley was right Feb 25, 2023 @ 10:43pm 
I figured out Daggerfall's various puzzles back when it first came out... on my own, lol. The problem isn't my 'toxicity': it's a general decrease in intelligence (or at the very least in attention-span) among modern gamers.
Altbert  [author] Oct 19, 2022 @ 1:55pm 
@HTB

Thanks! I'm not easily insulted. Tough skin. Hear, read, forget!
Altbert  [author] Oct 19, 2022 @ 1:52pm 
@Lost Trekkie

For really insulting me you have to do better! This is a guide from some 5 years ago! BTW, I'm also a long time TES fan, ever since Arena.

Although these are called puzzles, Skyrim is not a puzzle game!
HTB Oct 19, 2022 @ 1:46pm 
Damn, Lost Trekkie's toxic. I appreciate the your efforts @Altbert, Especially because these puzzles are so simple it can be extremely infuriating if for whatever reason you can't find the solution. Thanks for putting all of them in a single guide.
Altbert  [author] Oct 19, 2022 @ 12:52pm 
In the game these are called 'puzzles'. Many players don't or didn't know you could find the solution by rotating the claws, or when the solution was plain in sight. If I want to play a game with real puzzles I will play Xing, the Myst/Riven series of games or The Talos Principle.
Mosley was right Oct 19, 2022 @ 12:44pm 
Lol: what 'puzzles'? In order to actually have 'puzzles' in Skyrim, you have to download the 'claws without hints' mod on nexus.
Praxyl The Mamagen May 6, 2018 @ 11:28am 
" All three pillars have to be rotated so that you face three carvings as shown in the following picture"
Praxyl The Mamagen May 6, 2018 @ 11:27am 
the following picture is just one symbol, to allow people to better understand it, either you can change the symbol to the 3 pillars with the symbol facing to you, or say all pillars must have the symbol below facing you, cuz it says that the pillars should be rotated as they are in the following picture
Altbert  [author] May 6, 2018 @ 11:24am 
In my guide it says: "All three pillars have to be rotated so that you face three carvings as shown in the following picture". If that's not clear enough, I'm sorry, but I'm not a native English speaker! Suggestions for proper text are more than welcome!
Praxyl The Mamagen May 6, 2018 @ 11:19am 
i didn't understand that you need al pillars to be one thing, you should've put a picture of the 3 pillars the right way or say all need to be with the symbol below. .-.