Patterns

Toki, realistic crochet Dachshund pattern

Finally I can show you something new and exciting! My first amigurumi dog on all fours is finished. This is Toki, a miniature Dachshund crochet pattern!

teckel haakpatroon, realistic dog amigurumi.

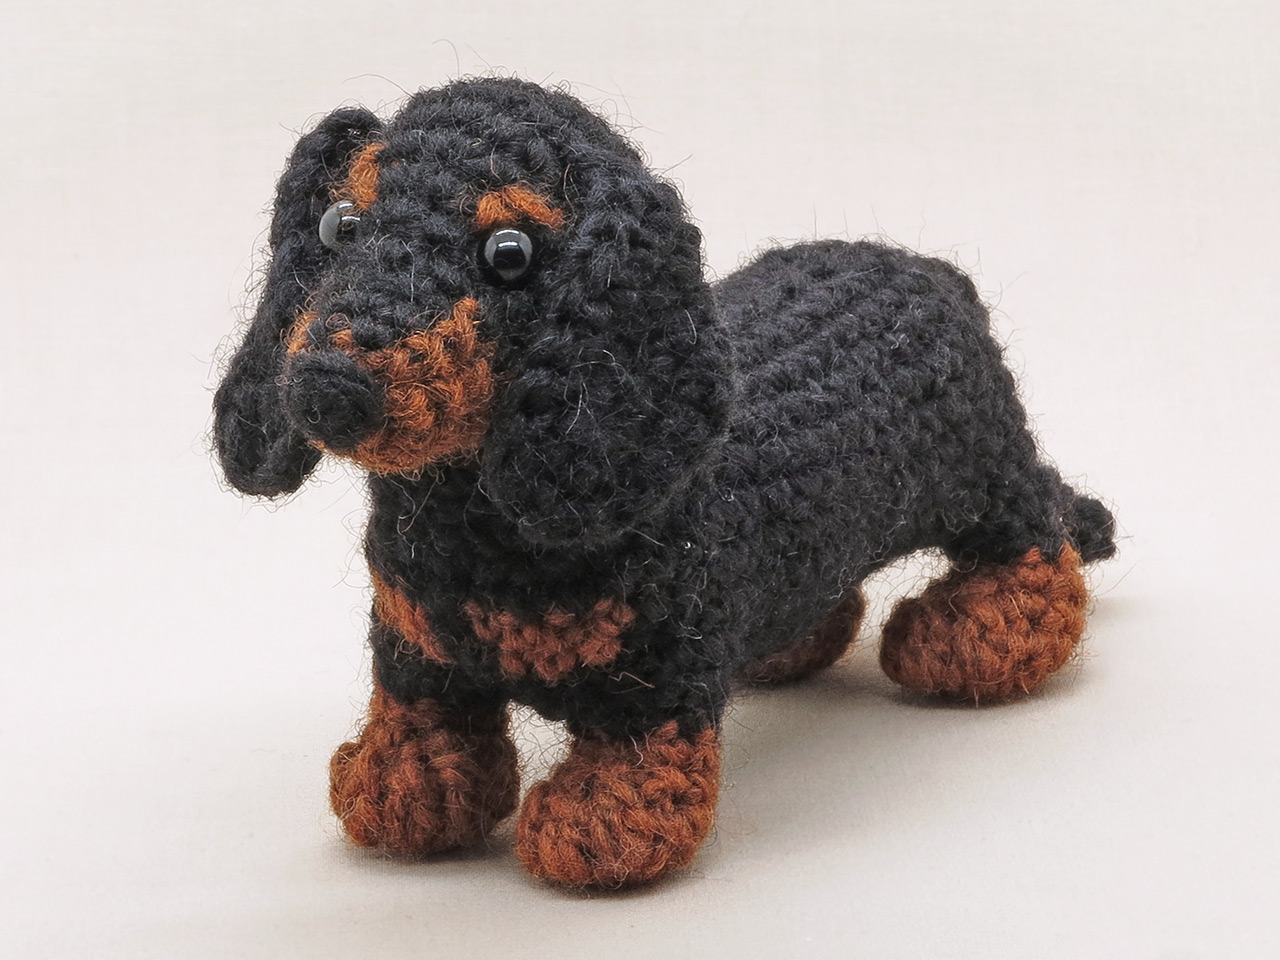
After designing a few sitting dogs, I felt like doing something new this time. A dog on all fours had been on my mind for a while, but I wasn’t sure how to do it. What dog could be more suitable for that challenge than a Dachshund?! A sitting Dachshund would be a bit dull, because it is the elongated body that makes it cute. So, I sat down and started crocheting ‘sausages on paws’ to make myself familiar with a new technique and the long-bodied animal.

After a few silly-looking sausage dogs in bright colours (I use left-overs from other projects before I use the intended yarn), I felt confident enough to start designing the actual dog. I already had made myself familiar with the technique of chaining four legs together, but how on earth was I going to write that down so that you would be able to do the exact same thing? A simple and effective solution presented itself and helps you work in the correct stitches. One hint: mark many stitches! My testers found that it worked very well and the dogs they made were a copy of Toki, I was relieved!

This pattern also contains something else new: images with little hints to point out certain steps. I often get asked if I have videos for a pattern. I do have a Youtube channel with tutorials for complicated constructions, but I prefer my patterns to be written, with supporting images. To make it easier for those who don’t like only written instructions, I added those images.

Anyway, this little dog was a joy to design, and I’m very satisfied with how it turned out. From a sausage on four paws with a realistic head, it evolved into an actual Dachshund-shaped dog, with a broad chest, an elongated body, and short stubby legs with broad feet. Even the hind legs run backwards like a real dachshund! I’m delighted that my ideas worked out. At some point I had quite a decent-looking crochet dachshund, but the belly and crotch where the same size, whilst a real dachshund has a broad chest and belly and a slim underbelly and crotch. The solution to that issue came when I was in bed. ‘What if I just use smaller stitches (sc’s instead of dc’s) for closing the back of the belly than for the rest of the belly?’ That worked like a charm.

Here are some more pictures of this cute and realistic mini-dachshund and below them you can find all the info you need about the pattern.

For an experienced crocheter this is an easy pattern, and I always try to write it in a way so beginners can make it too. The body of the dog is rather small, so once you’ve connected all the pieces, it works up pretty fast. I explained very thoroughly as to what stitches you need to work, and I added extra images to make sure you understand how everything works.

This dog is made with Istex Lett Lopi, a 100% wool with a lot of fuzziness. It’s 6 inch / 15 cm long and about 4 inch/ 10 cm high. The pattern contains a clear and colour-coded description of how to crochet and assemble the doll, with instruction images with notes next to the text and pictures of the finished doll at the bottom. In the pattern you can also find out what materials you need, the yarn colour numbers — in short, everything you need to know to make your own realistic Dachshund amigurumi. All the additional information you need to know about this pattern you can find in the shop listings. You can purchase it in my shop at Ravelry, Etsy or order it here.

And heads up! This pattern has a one dollar release discount till the 25th of May.

Patterns

Finnly, crochet Border Collie pattern

After a long break, I’m delighted to publish this new dog pattern! Meet Finnly, the realistic Border Collie, a fabulous amigurumi of one of my favourite dogs!

realistic crochet dog pattern

When I started making dog patterns I really wanted to do a Border Collie, but the long-haired features of this Collie kept me from actually making one. I started with less hairy dogs, and then must have gone mad to make a bearded Schnauzer pattern. That actually was a lot of fun to do, and it gave me much inspiration for how to do the Border Collie and other dogs. For the Schnauzer I had used ‘reversed loop stitches’ to create the bearded face, and I knew those stitches would be very suitable for any kind of hairy dog.

So some time in May I started the Collie design. The head was finished pretty quickly, but then a lot of things happened in my life, good things! We finally could move to a new home, away from that noisy house we tried to make our home for so long. Moving means a lot of things to do, so I put the dog on hold until we had settled down in our new home and I had enough ‘space in my head’ to continue designing.

It felt so good to sit down at my improvised desk with a new view and peace and quiet. I worked my way through the body and back paws and spend a whole afternoon on making the fidgety hairy tail. And now I have this amazingly cute mini Border Collie sitting on my desk, waiting to be made by many other Border Collie fans out there.

This is not a very difficult dog to crochet, the reversed loop stitches take some getting used to, but when you get the hang of it they actually are fun to do.

Here are some more pictures of this adorable crochet dog amigurumi and below them you can find info about and links to buy the pattern.

Info about & links to buy the pattern

This is a moderate pattern to make. Most parts work up pretty easily, but the reversed loop stitches for the head, chest and tail take some extra effort. The Border Collie dog is made with Istex Lett Lopi, a 100% wool with a lot of fuzziness. It’s 5.1 inch /13 cm sitting. The pattern contains a clear and colour-coded description of how to crochet and assemble the Collie, with instruction images next to the text and example pictures at the bottom to help you get everything right. In the pattern you can also find out what materials you need, the yarn colour numbers — in short, everything you need to know to make your own adorably mini dog. All the additional information you need to know about this pattern you can find in the shop listings. You can purchase it in my shop at Ravelry, Etsy or order it here.

And heads up! This pattern has a one dollar release discount until October the 20th!

Because I had so much fun designing this hairy dog and because it looks a lot like the wolf I used as an example when I made Woolfie, my next pattern will be a ‘Woolfie advanced’. I think you can imagine how that’ll look! And after that… a realistic otter, I want to make a red cardinal bird, a skunk and a poodle. Oh, there are so many lovely animals to make next, see you soon!

Patterns

Schnoodge, crochet Schnauzer pattern

I proudly present to you something completely different: Schnoodge the crochet Schnauzer pattern!

realistic crochet dog pattern

After I finished my second dog pattern, I got so many requests for all sorts of dogs that I decided to do at least two dog patterns a year. One night when I was in bed I suddenly thought, ‘How much fun would it be to design a bearded Schnauzer?’ and I pictured a very cute hairy Schnauzer face.

When still working on the Siamese cat, I tried a first bearded dog head just to check if it would work, and the result was so delightful that I knew this was going to be the first new dog.

To make a bearded dog, there was one thing I had to find a new solution for: the loop stitch that would create the long brows and beard. Normally, the loop forms on the inside of your work, so you have to turn the piece inside out. That would mean that the complete head had to be turned inside out and the stitches without loops would also be the wrong side, and I don’t like that look. I had to find a way to get the loops to the front side.

How hard could it be to just pull the loops through each stitch after it was finished? I tried several ways and each time I cut the loops very short after I’ve pulled them through the stitches to see if the stitches would hold. Most of my methods were as secure as the ‘normal’ loop stitches, so I could just pick the one that had the best look. In the end it works the same as the normal loop stitches. As long as you don’t cut the loops shorter than 1 cm/ 0.5 inch, the stitches will hold, even if you put a lot of pressure on them. And for those of you who don’t like doing a complicated loop stitch, I added the instructions for how to attach the hair later.

Now, I could write more about designing this dog, but I want to tell you something about making choices.

Personally, I find that making choices is the most difficult thing about designing crochet animals. And it’s not a few choices I have to make! For every little thing there are options to consider. Mostly it’s about sizing, but also about how realistic I want a design to be. It’s like, ‘Shall I make the legs 10 stitches wide, or would they look better a little bit bigger?’ I have to try both to see how it looks. When I see the result I think, ‘What if I make them shorter, would that be better’? So I have to make another body with shorter legs to see how that looks, et cetera. After many more choices, I assemble the animals, and then come new questions. ‘Would it have looked nicer if I made the neck a little bit thicker?’ I can choose to try that, or I can leave it as it is. I could go on like this for a while, lol. In the end I always love the result and all the choices that can drive me nuts are worth the effort!

Here are some more pictures of this super-cute Schnauzer amigurumi, and below them you can find all the info about the pattern.

Info about & links to buy the pattern

This pattern is quite advanced because of the reversed loop stitch. I’ve added the link to a tutorial online and added a clear description of how to pull the loops through, but a stitch like this requires more skill than basic stitches. For beginners who really want to make this dog I also added an instruction for how to insert the hair later.

This dog is made with Istex Lett Lopi, a 100% wool with a lot of fuzziness. It’s 5.1 inch /13 cm sitting. The pattern contains a clear and colour-coded description of how to crochet and assemble the doll, with instruction images next to the text and example pictures at the bottom to help you get everything right. In the pattern you can also find out what materials you need, the yarn colour numbers — in short, everything you need to know to make your own silly Schnauzer doggy. All the additional information you need to know about this pattern you can find in the shop listings. You can purchase it in my shop at Ravelry, Etsy or order it here.

And heads up! This pattern has a one dollar release discount till the 5th of May.

Patterns

Hambea, crochet beagle pattern

amigurumi beagle

When I was a little girl, beagles were my favourite dogs. I found them perfection. Their size, proportions and colouring I absolutely adored. And they had such a sweet face, too! I really wanted to have a beagle, but my mum wasn’t so much a dog-lover, and after a failed attempt to own a dog (a basset hound because they could not jump at her), I knew owning a beagle would not happen as long as I was a child. I got over it, and while growing up I became more a cat person, so I still haven’t owned a beagle and probably never will. But now I do have this little beagle friend! I made Hambea to honour my childhood adoration.

This being the second dog pattern I made, I could turn all my attention to the colouring. Creating the pointed white line on the face was the most difficult part, because of awkward decreases that were in the way. But practise makes perfect, and in the end I got a facial stripe that looks the way I pictured it. Beagles have such a distinctive colour pattern on their body, and I really enjoyed designing that. It was such a delight to see the beagle slowly take shape.

I always work with Istex Lètt Lopi, but I could not find the perfect reddish brown for a beagle. I decided to use Istex Einband Lopi, the lace version of Lett Lopi, and hold two strands together, which worked perfectly well. When I saw the beagle one of the testers made, I realised the acorn brown Lètt Lopi also worked well.

Hambea doesn’t have a collar or harness, but I did add the instructions for a harness to the pattern, for those of you who want to give their beagle a little extra colour.

Here are some more pictures of Hambea, and below them you can find all the info you need about this pattern and links to buy this amigurumi beagle pattern.

Info about & links to buy the pattern

The pattern for this realistic crochet beagle is rather easy, but the colour changes require some extra concentration. Even less experienced crocheters will be able to make this dog.

Hambea is made with Istex Lett Lopi and Einband Lopi (held together matching one strand of Lett Lopi), a 100% wool with a lot of fuzziness. He’s 5.1 inch /13 cm sitting. The pattern contains a clear and colour-coded description of how to crochet and assemble the doll, with instruction images next to the text and example pictures at the bottom to help you get everything right. In the pattern you can also find out what materials you need, the yarn colour numbers — in short, everything you need to know to make your own dog. All the additional information you need to know about this pattern you can find in the shop listings. You can buy this pattern in my shop at Ravelry or Etsy or order it here.

And heads up! This pattern has a one dollar release discount till Tuesday, the 1st of April!

Patterns

Golden Boy, realistic golden retriever pattern

I proudly present to you the first realistic dog pattern in a new series of dogs, Golden Boy the golden retriever, and he could as well be a blond labrador!

realistic dog amigurumi

‘A new series?’ you ask. Yes, for a long time I’ve been getting requests to design realistic dog patterns for all sorts of breeds. Because I prefer making wildlife patterns, I hadn’t responded to those requests. But something changed my mind. I noticed that many crafters have turned my wolf pattern Woolfie into a dog, which made me realise how enthusiastic people are about making dogs, and especially their own dog. So I decided to do a series of realistic dog patterns. My ultimate favourite dog is the border collie, but I also love blond golden retrievers with their sad puppy dog eyes and black noses. I decided to start with a single-coloured dog to completely focus on dog shapes, and when I’m more familiar with that, I can do dogs with their individual breed’s colouring, like the border collie and the beagle. And after coloured dogs, or in between, I can focus on the challenge of dogs with special kinds of fur, like poodles and bearded collies. It sure offers many exciting variations!

I never expected I would love designing a realistic crochet dog so much, but believe me, it’s fabulous when you ‘catch’ a breed’s true character in its facial features, and when I had my first prototype face done it really made me smile. The sad puppy dog eyes I love so much are truly there. Now every time I see Golden Boy looking at me with his sweet eyes I want to give him a little cuddle, he’s so adorable. Breeding and selection eventually created that expression that humans love so much, and I’m very excited that it is so easy to capture in crochet.

Because golden retrievers and labradors often are guide companions, I decided to give Golden Boy a colourful harness. Guide dog or just a pet, the harness makes him look extra cute! Below the pictures you can find all the info you need and links to buy this amigurumi dog pattern.

Info about & links to buy the pattern

The pattern for Golden Boy is easy; you can surely finish a dog in a day. It’s also a very suitable pattern for those of you who have just started crocheting amigurumi, because there are no colour changes and only basic stitches are used. The things that look more complicated are explained in detail, with images to guide you.

This dog is made with Istex Lett Lopi, a 100% wool with a lot of fuzziness. He’s 5.1 inch /13 cm sitting. The pattern contains a clear and colour-coded description of how to crochet and assemble the doll, with instruction images next to the text and example pictures at the bottom to help you get everything right. In the pattern you can also find out what materials you need, the yarn colour numbers — in short, everything you need to know to make your own dog. All the additional information you need to know about this pattern you can find in the shop listings. You can buy this pattern in my shop at Ravelry, Etsy or order it here.

And heads up! This pattern has a one dollar release discount till Tuesday, the 11th of Februari!