BKG Brew Guide: How to make the perfect Moka Pot

Moka pot is without a doubt one of the most iconic coffee makers. Also known as la macchinetta, you may have seen it in a movie, on the shelf of your favorite coffee spot, in the kitchen when you visit Europe, or like us, you might even have one yourself.
Moka pot was invented by Alfonso Bialetti who acquired his knowledge and metal-working skills when he was in France. Bialetti released its first moka pot in 1933, and is still selling the very same design even till this day. The timeless model is called Moka Express. The mustachioed little man mascot holding his index finger up as if asking for a shot of caffe is the caricature of the inventor’s son, Renato Bialetti, who later took over the family torch and brought the brand to an international new height. Today, Bialetti remains the oldest moka pot manufacturer and still the most well known.
Moka Express is convenient, affordable and makes good quality coffee. It is an important product that changed how household coffee is consumed. Bialetti is also one of the few companies to start using aluminum for kitchen appliances. While it was reassured that there’s no safety concerns, it is however noted that aluminum does impart a noticeable metal taste in extreme cases. We recommend minimizing prolonged contact with water when using moka pot made with aluminum to avoid irreversible oxidation. Luckily, there’s also a lot of different designs and material options in today’s market.
Fun fact: Alberto Alessi of the Italian design power house Alessi is in fact Alfonso Bialetti’s grandson. Genius runs in that family.
Today, we focus on how to brew a strong yet smooth and absolutely delicious coffee with a 1-cup moka pot. Please be advised to use caution during the brewing process particularly in regards to hot surfaces and liquid. Here’s a list of what you will need:
. coffee beans
. burr grinder
. moka pot
. demitasse spoon
. dry towel of mitten
. stove or other direct heat source
. scale (optional)
. kettle (optional)
STEP 1: GET THE WATER READY

A moka pot has several parts: water reservoir, funnel, gasket, screen and serving chamber. The water reservoir is where you pour the water for your brew. There is little control over water temperature for moka pot. The same goes for any heat exchange percolated method. However, It is important to pay attention to the water level, which should never exceed the pressure release valve.
Fill the reservoir with 150g of water. If you don’t have a scale, it’s just slightly under the bottom of the pressure valve.
You can place the water reservoir directly on a heat source to heat up the water. Some might even assemble the entire moka pot before heating it up. But while this may be the most convenient method, we find the extended period in a heated environment tends to over-extract coffee. We instead would recommend using preheated water for brewing to reduce the time of heat exchange, but only assemble the moka pot after the water has reached near boiling temperature before continuing with the brewing.
STEP 2: GRIND YOUR COFFEE

Freshly ground coffee and uniform fine particle size will make a night and day difference on the coffee flavor with this method. If your grind size is too coarse, you would end up with a watery and lifeless cup; if the grind size is too fine, your coffee might be too muddy and intense. A general direction is several degrees finer than your AeroPress grind, roughly halfway between an espresso grind and pourover grind.
Feed 14g of coffee ground into the funnel without compacting. A very effective way is to use a demitasse spoon to break up any possible clumps and spoon the ground coffee in the funnel without pressing down. Use the back of the dinner knife or your index finger to level off the ground. If you don’t have a scale, it’s about level with the rim of the funnel. Firmly tap the funnel on a sturdy surface a handful of times, you’ll notice that the ground is now about ¼ inch below the rim. The goal is to collapse loose lumps to eliminate large voids while avoiding compacting coffee.
STEP 3: ASSEMBLE MOKA POT
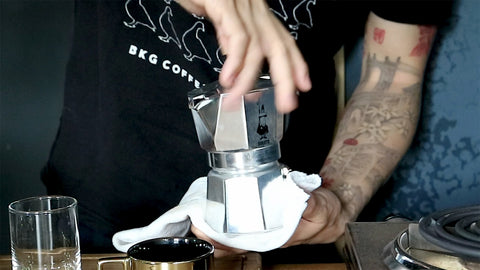
Assemble your moka pot from bottom to top as sequenced in STEP 1. Make sure the gasket and screen are securely installed to the serving chamber. Be mindful and use a dry towel if you are using preheated water. To avoid dislocating the handle, lock the serving chamber in by holding it firmly by its body and screwing it clockwise onto the water reservoir.
STEP 4: HEAT, OBSERVE AND SERVE

Place the assembled moka pot on a direct heat source. If you use preheated water close to boiling temperature, you should see the first drop of coffee around 45 seconds after you turn on the heat. At around the 1 minute mark, you should see thick foam start coming through. This is your queue to close down the lid and turn off the heat. The moka pot should finish brewing around 2’00”.
If you’re using a stove and the opening of the grate is too large for the moka pot to comfortably sit on, you can purchase an adapter or use an oven rack underneath the moka pot. We strongly recommend NOT to place the moka pot directly on a flame burner without elevation.
You will find about 10g to 15g of water still in the water reservoir after brewing. It is completely normal as the vacuum break prevents the last bit of water entering the funnel. That being said, this means our brew ratio is about 1:10 of coffee to water.
HOW TO DIAL IN YOUR COFFEE

How do you tell if your moka pot brew is successful? You can take a look at your brewed coffee pod. If it has the imprint from the screen but no other visible holes or wet slurry, then you know you’ve brewed yourself an evenly extracted cup. On the contrary, if you see big holes or if the coffee ground is still very wet, then your coffee may have suffered some channeling. This means the water does not pass through all the available coffee ground evenly. In this case, before you make other adjustments, you need to make sure you’re distributing the coffee grounds more evenly in the funnel and make sure to tap it firmly after loading the coffee.
Are there visible loose spots especially along the rim? While the physics of using a moka pot might be the same, different coffee and ground consistency can still result in a different taste. Trust your palate by brewing a test batch. Sampling the brew at different temperatures can also give you different perspectives on how you should approach making adjustments. If you find a high level of sediment in your cup, you can try sifting your coffee ground first with the combination of using a coarser grind. If you find the texture of the coffee to be watery and pale in color by comparison, try a finer grind size.
BONUS PRO TIPS
Moka pot might not have much flexibility in terms of water temperature and control over brew time, but you can still manipulate brew strength by adding water to the cup afterwards. Add water in small increments until you find the sweet spot.
Overall, a moka pot is great for making a balanced and creamy coffee. However, if you would like to explore the higher acidity notes, you can look into water composition. A water close to 100ppm, with a PH level around 7 and magnesium to calcium ratio about 2:1 can really bring in a lot of vibrant notes to a moka pot coffee. Tune in for a brief intro about water science and its role in coffee extraction in the near future.
HAPPY BREWING
Hope you like brewing moka pot as much as we do. We find it to be a very comforting ritual early in the morning when the season is starting to get a little chilly. The coated texture and saturating taste of a balanced coffee really refreshes and resets your mind for a brand new day. Let us know your thoughts on this recipe. Do you like how it turns out? Which coffee are you using?
Please check out our current coffee curation on our website if you haven’t already. We encourage you to try and explore different origins. Have fun and we will see you on our next blog!
You Might Also Like